Why Crispy Baked Avocado Fries Should Be Your Go-To Appetizer This Year
Have You Ever Thought About Turning a Healthy Snack Into an Unforgettable Treat?
Imagine biting into something that’s both crunchy and creamy, packed with flavor yet surprisingly good for you. Sound too good to be true? Well, it’s not! Enter Crispy Baked Avocado Fries , the appetizer that’s taking over parties and weeknight dinners alike. But why stop there? Could this dish become your go-to snack for every occasion this year? Let’s dive in and find out!
What Makes This Recipe Special?
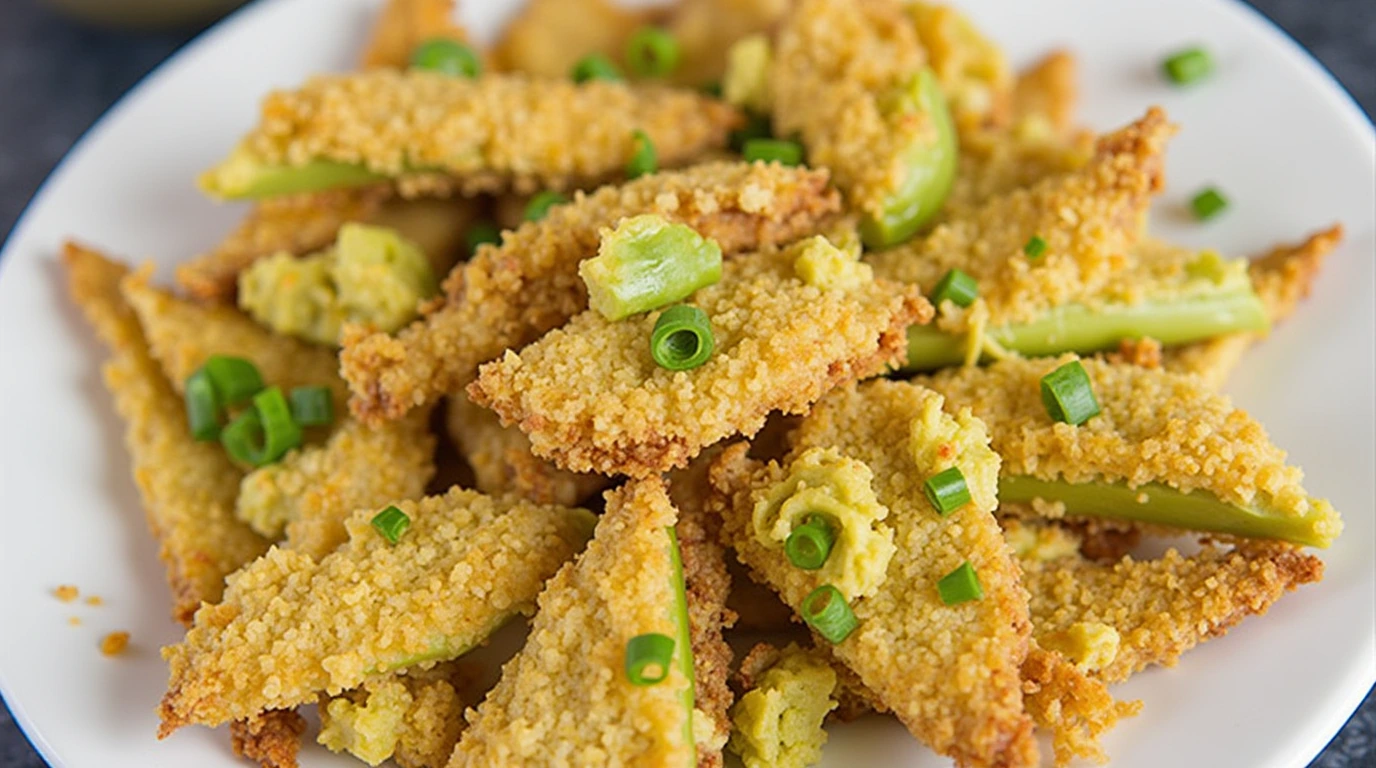
Crispy Baked Avocado Fries are more than just a fun twist on traditional fries—they’re a celebration of texture, taste, and nutrition. Made by coating avocado slices in a golden, crispy exterior and baking them until perfection, these fries offer all the satisfaction of deep-fried snacks without the guilt.
This recipe takes about 30 minutes from start to finish and is considered easy to moderate in difficulty. Whether you’re hosting a game day party or looking for a quick snack, these fries are versatile, healthy, and oh-so-delicious.
Essential Ingredients for Making Crispy Baked Avocado Fries
To create restaurant-quality results at home, here’s what you’ll need:
- 2 large or 4 small avocados : Choose firm but ripe avocados so they hold their shape during cooking 2.
- Flour (garbanzo flour or all-purpose) : Acts as a base layer to help other coatings stick.
- Eggs or egg substitute : Helps bind the breading mixture to the avocado slices.
- Breadcrumbs or crushed tortilla chips : Adds crunch and texture to the outer layer.
- Parmesan cheese (optional) : Enhances flavor and creates a cheesy kick.
- Seasonings (garlic powder, salt, pepper, cumin, coriander) : Elevates the taste profile with aromatic spices.
- Olive oil spray or cooking spray : Prevents sticking and ensures even browning.
Substitutions and Variations:
- Swap breadcrumbs for crushed cornflakes or panko for added crunch 6.
- Use almond milk or another plant-based milk if avoiding eggs 3.
- For a gluten-free option, opt for garbanzo flour and certified gluten-free breadcrumbs 7.
Step-by-Step Instructions
Follow these steps to achieve perfectly crispy avocado fries every time:
Step 1: Prep Your Avocados
Carefully slice the avocados lengthwise into wedges, removing the pit and peeling off the skin. Try to keep the slices uniform in size for even cooking.
Step 2: Set Up Your Coating Stations
Prepare three shallow bowls:
- Bowl 1: Flour (or garbanzo flour).
- Bowl 2: Beaten eggs mixed with a splash of milk.
- Bowl 3: A combination of breadcrumbs, grated Parmesan (if using), and seasonings like garlic powder, salt, and cumin.
Step 3: Bread the Avocado Slices
Dip each avocado wedge first in flour, shaking off any excess. Then, dip it into the egg mixture, ensuring full coverage. Finally, coat it generously in the breadcrumb mixture, pressing lightly to ensure the crumbs adhere 5.
Step 4: Arrange on a Baking Sheet
Place the coated avocado slices on a baking sheet lined with parchment paper or lightly greased foil. Leave space between each piece for proper airflow.
Step 5: Bake Until Golden Brown
Preheat your oven to 400°F (200°C). Bake the avocado fries for 18 minutes, flipping halfway through, until the outsides are crispy and golden 1. Alternatively, bake at 340°F (170°C) for 17-19 minutes without flipping 8.
Assembly and Presentation Tips
Once your fries are baked to perfection, it’s time to serve them up with style:
- Pair with dipping sauces like chipotle mayo, ranch dressing, or salsa for extra flavor.
- Garnish with fresh herbs like cilantro or parsley for a pop of color.
- Arrange neatly on a platter or in individual servings for a polished look.
For presentation ideas, consider serving the fries in mini cups or baskets to make them feel extra special.
Storage and Make-Ahead Tips
If you want to prepare ahead of time, here’s how:
- Refrigeration : Store unbaked fries in an airtight container for up to 24 hours. Simply bake according to instructions when ready.
- Freezing : Freeze raw coated fries on a tray, then transfer to a freezer-safe bag. Bake directly from frozen, increasing the cooking time by 5-10 minutes.
- Reheating : Reheat leftovers in the oven at 350°F (175°C) for 5-7 minutes to restore crispiness 9.

Recipe Variations
Feel free to experiment with different flavors and textures:
- Spicy Version : Add red pepper flakes or cayenne to the breadcrumb mixture for heat.
- Mexican Twist : Incorporate diced jalapeños or chili powder for a southwestern flair.
- Cheesy Delight : Sprinkle shredded cheddar or Monterey Jack cheese on top before baking for a melty finish.
Conclusion
Making Crispy Baked Avocado Fries doesn’t have to be complicated. With simple ingredients and a few key techniques, you can enjoy a healthier alternative to traditional fries that’s bursting with flavor. Don’t hesitate to get creative with seasonings and presentations to make this dish your own. Whether you’re entertaining guests or treating yourself, these fries are sure to become your new favorite snack!
FAQs About Crispy Baked Avocado Fries
Q: How long do I bake the avocado fries?
A: Bake at 400°F (200°C) for 18 minutes, flipping halfway through, or at 340°F (170°C) for 17-19 minutes without flipping 1.
Q: Can I use frozen avocados?
A: Fresh avocados work best, but if you must use frozen ones, thaw them completely and pat dry thoroughly before coating 2.
Q: Are these fries healthy?
A: Yes! Avocados are rich in healthy fats, fiber, and nutrients. Using baked methods instead of frying keeps the calorie count lower while preserving flavor 7.
Q: Can I freeze the prepared fries?
A: Absolutely! Freeze uncooked coated fries on a tray, then store in a freezer-safe bag. Increase baking time by 5-10 minutes when reheating from frozen 9.
Now that you know how to make Crispy Baked Avocado Fries , it’s time to roll up your sleeves and give it a try! Enjoy the process, share your creations with friends and family, and don’t forget to experiment with your favorite flavors. Happy cooking!

